

Individuals with epilepsy or depression may benefit from vagus nerve stimulation. This is a treatment that can help lessen the occurrence of seizures and help treat symptoms of depression. However, most traditional vagus nerve stimulation devices require an invasive operation, and many have turned to transcutaneous electrical nerve stimulators (TENS) for help.
I found that the best TENS unit for vagus nerve stimulation is the Premium TENS + EMS Therapeutic Wearable System from iReliev, as it’s incredibly easy to use and read. It has a frequency programmed that is perfect for relieving pain symptoms
However, there’s also the budget-friendly TENS 7000 unit for those watching their wallet. And if you want the best possible unit, the iReliev TENS + EMS Pain Relief & Recovery System is the ultimate upgrade option.
Though each of these options will require a little adaptation to function as a transcutaneous vagus nerve stimulation (tVNS) device, they’re also the best-suited models for adjustment and tVNS therapy. In this article, I will look at these units in greater detail and explain how to adapt a standard TENS unit into a capable tVNS machine.
How High Should I Set My TENS Unit? click here to read what settings to use.
My Favorite
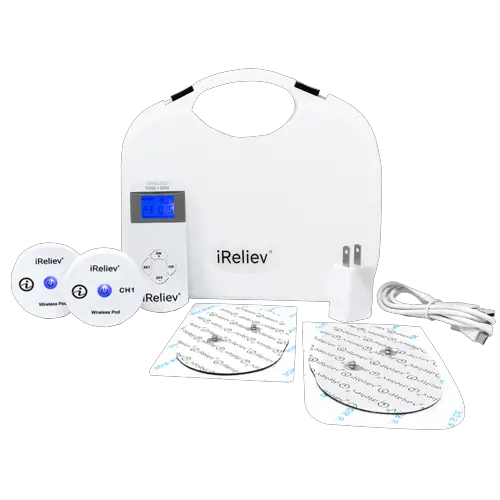
iReliev Premium TENS + EMS Therapeutic Wearable System
The iReliev Premium TENS + EMS System is my favorite model for at-home nerve pain relief. It features 14 distinct programs, eight of which are specifically designed to help relieve both chronic and acute nerve pain. This device even has a plan for nerve pain that is caused by arthritis.
Wireless TENS units are incredibly rare, and this system features one of the most advanced and easy-to-use wireless networks available. To use, you only need to attach the adhesive electrode pads, connect the receiver pods, set your desired settings, and enjoy. The included electrodes have a sticky, adhesive side that can be reattached to skin multiple times.
Included within this system are two adhesive pads, both of which are large-sized. However, replacement pads are available for purchase and come in both small and large sizes. The two receiving pods that come with the Wearable System go directly over the electrode pads and snap onto the connectors built into the pads.
The pods receive vital information from the wireless remote, allowing them to produce the right amount of stimulus at the right time. They’re self-powered and completely rechargeable, just like the remote. These receiving pods are fantastically lightweight, and they are thin enough to be virtually unnoticeable beneath loose clothing. Consequently, this model is one of the most wearable and most convenient options.
The included charging cable is outfitted with three identical adapters that fit into the receiver pods and wireless remote. This way, users can charge all three devices via a single USB cable. This charging cable can be plugged into your home computer’s USB port, or you can attach the AC/DC adapter and plug it into a standard wall outlet.
Speaking of charging internal batteries, the charging time for this TENS unit is between two and three hours, all components included. The remote takes a little extra time to charge but can be ready for use in just three hours. The receiving pods take even less time to charge, and they can be ready for therapy after about two hours, though most will only need to wait an hour and a half to see a full charge.
Comparable models don’t have helpful battery indicators, but the Wearable System is unique. The receiving pods feature battery-charge indicator lights that change colors. The centers of these pods are bright blue when turned on, and they flash when the battery’s energy levels are dwindling. While it’s charging, the light shifts to a bright orange color. When it’s finished charging, it turns gray. This helps users stay aware of their current battery usage.
Unlike the receiver pods, the wireless remote doesn’t feature a light indicator. However, it does flash a low battery icon on the display screen to let users know that it’s time to recharge. The wireless remote will also display a full battery icon while connected to a charge source, but only if the battery can no longer store any excess power.
The backlit screen is bright blue and incredibly easy to read, no matter what time of day it is. Besides alerting users about their unit’s battery life, the wireless remote’s display screen also shows:
- The wireless connection status
- The chosen program number
- The time remaining for the treatment session/set timer amount for the session
- The desired intensity level
- The current channel that you’re accessing
The display screen works hand-in-hand with the four directional buttons laid below it. These buttons allow users to select their settings. The directional buttons are labeled with clean, clearly legible text for improved ease of use. Browsing through the 14 programs is nearly as exciting as experiencing them all.
Though these programs are divided into TENS and EMS therapies, those with nerve pain can benefit from both types. Some of the programs included in this system are:
- Seven TENS therapies designed to help treat chronic and acute pain
- Focused arthritis TENS therapy
- Pre-exercise EMS therapy for athletes or active individuals
- Specific muscle-recovery therapy
- Two unique muscle-strengthening therapies
Each of the 14 programs uses a specific pulse rate and pulse width, helping users target their pain and discomfort more accurately and appropriately. When you take advantage of the included Output Mode guide, you’ll discover what each mode is capable of and decide which programs best suit your needs. Thanks to the quad-channel capability of this system, you’ll be able to treat multiple target areas simultaneously.
To enjoy the benefits of having four channels, you’ll need to purchase additional receiving pods, as the system kit only comes with two. You’ll also need to invest in additional electrode pads. This is a generally wise purchasing decision, as you’ll eventually need to replace the original pads, especially as the adhesive wears thin.
However, the included accessories and additional pieces of equipment make this system more than worth it. The included hard plastic carrying case and the soft unit tote bag are great practical extras that can help extend the life of the system and its components.
The iReliev Premium TENS + EMS System is an overall fantastic choice for individuals with nerve pain thanks to its wide range of effects TENS therapies. Its EMS therapies are also useful, especially for active users who experience frequent muscle soreness or stiffness.
Battery Type: Rechargeable
Channels: 4
Wireless: Yes
Included Pads: 2
Programs: 14
EMS: Yes

Budget-Friendly Option
TENS 7000 2nd Edition TENS Unit
If you’re only interested in getting a TENS unit for tVNS therapy, and you’d like to secure the most affordable-yet-effective option possible, then the TENS 7000 might be the right model for you. It’s simple, straightforward, and easy to use.
While it only comes with four electrode pads, this won’t be an issue if you’re only using them to create electrode earbuds. You’ll still have plenty of material to work with. This model comes with a hard plastic carrying case to keep cables, and the display unit, in excellent condition. The dual channels are great for those hoping to enjoy non-invasive at-home tVNS treatment, and a protective flip cover helps keep intensity dials out of reach during use.
Another thing to consider when examining this device is its warranty. This unit comes with a solid 1-year warranty, and when users operate their machine with care, the TENS 7000 can last for several years. However, night-time users are sure to be disappointed by this unit’s lack of backlit screens or illuminated buttons.
An upgraded version of this model does exist and may be the better choice for some buyers.
Battery: Replaceable, 9-Volt
Channel: Dual Channel
Pulse Width Adjustable: Yes
Frequency Adjustability: Yes
Included Pads: 4
Backlit Screen: No
 Get an Upgrade
iReliev TENS + EMS Pain Relief & Recovery System
The iReliev TENS + EMS Pain Relief & Recovery System is an upgraded version of the wallet-friendly Pain Relief unit. It has a lot more going for it than additional electrode pads. The most significant difference from its lower-priced alternative is its functionality. You see, this sweet little device is capable of both TENS therapies and EMS treatments.
To facilitate this additional function, the manufacturers added a few extra electrode pads to this system, including two large-sized ones that are perfect for larger body regions like the back and shoulders. While these bonus pads aren’t entirely necessary, they are a nice addition.
This system offers 14 unique TENS/EMS therapies, and each one is programmed to provide maximum pain relief for chronic and acute sufferers. There is also an arthritis-focused program for those suffering from painful joints and inflammation.
Getting ready to use this system is simple and straightforward. All you need to do is follow these steps:
- Attach the electrodes above, below, or beside the desired treatment area. Placing electrodes directly onto the sore area can result in excess pain or prolonged discomfort.
- Snap the lead cables onto the electrode pads and plug their adapters into the control unit.
- Turn the unit ON.
- Select the desired timer, program, and intensity settings.
The timer works in ten-minute increments and has a maximum limit of an hour. Still, for your first time using a TENS/EMS device, you should only attempt a 15-minute, low-intensity program. From this point forward, you’ll be better able to adjust and customize your required settings without risking self-injury.
And like the Pain Relief unit, this system includes a belt clip adapter and expansive lead cables, allowing users to wear their TENS/EMS unit while performing simple errands and tasks. Unlike comparable models that typically have very short cables, this system seems to encourage movement and mobility.
Of course, if you’re someone who often bumps into objects around you, it’s easy to feel concerned about possibly changing the program mid-session, or increasing the intensity level while walking around the house. However, if you activate the locking mechanism, this won’t be an issue.
If the Premium Wearable System is a little too much, but the Pain Relief unit is just too little, then the TENS + EMS System may be just right.
Battery Type: Replaceable
Channels: 2
Wireless: No
Included Pads: 12
Programs: 14
EMS: Yes
Want to know where a TENS unit can be placed? Check out my TENS placement guide here.
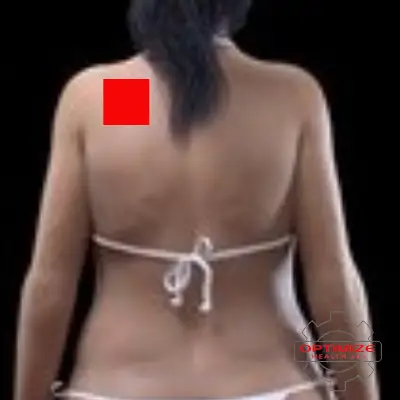
TENS Placement for Vagus Nerve Stimulation
First connect the red lead wire on the TENS unit to the ear clip on the tragus. If you need an ear clip that is specifically designed for a TENS unit click here.

You will then place the second electrode pad with the black wire on the left side of your back shoulder:
Adapting a TENS Unit for Vagus Nerve Stimulation
Most TENS units do not come with vagus nerve stimulation adapters or programs, which can make it incredibly challenging to find the best unit for this specific type of therapy. However, with a little dedication and know-how, anyone can prepare their unit for vagus nerve stimulation.
There are two primary pathways you can take. Either route requires you to purchase a set of plastic ear clip electrodes. However, after doing this, you could take one of two things:
- Construct a single earbud electrode by putting two different electrodes together.
- Create positive/negative electrode earbuds by stripping fabric electrode pads and recycling them into the plastic earbuds.
To help you better understand how these two processes work, let’s explore both options in further detail. After all, the type of equipment you’ll need will vary depending on which adaptation you choose.
Combining Earbuds
Creating a comfortable, practical, and long-lasting combined earbud electrode is an attractive alternative to working with exposed black fiber, but it does require a little more equipment. For example, before attempting this project, you’ll need:
- Two pairs (4 total) plastic earbud electrodes
- A rotary tool/dremel or comparable cutting tool that can safely handle plastic
- A set of hard plastic safety goggles or glasses
- Sandpaper sheets, 220, 400, 800, 1200, and 1500 grit.
- A pair of rugged safety gloves
- A small bottle of superglue or plastic-safe, fast-drying adhesive
- A TENS unit with two outputs or channels and adjustable pulse width, frequency, and time
However, if you already happen to own most of these items, your immediate expense will be slightly less. And even if you don’t own any of the above supplies, the overall expense will still remain relatively small. At the end of the project, you’ll have an effective vagus nerve stimulation device and a dremel or cutting tool that you can use for future ventures.
Once you have gathered your supplies and you’re ready to begin, you’ll only need to take ten simple steps. Prepare your work area and:
- Deconstruct your earbuds. Carefully pry apart your plastic earbuds. It should be fairly easy to complete this step, as you will want to focus on taking the metal part out of both sides. This way, you won’t need to deal with any snapped or broken plastic. Place both sides of the earbud, and the metal component, aside for later use.
- Get safe. Put your gloves and safety goggles on and prepare your cutting tool. It may be wise to complete this step in a secure area, over a newspaper or a plastic sheet. Any small particles or pieces of plastic can be difficult to clean up without these precautions. In addition, following these safety practices reduces the risk of injuries or accidents.
- Operate your cutting tool. Now that you’re wearing your safety gear, and you’re in a clean work area, you can go ahead and use your dremel or rotary tool to cut the flattened, rounded half of the electrode. Be sure that you’re cutting into the side that does not have a connector input or rubberized earbud tips. Leave the flattened, rectangular piece intact, and only remove the circular section of this singular piece.
- Make it smooth. Depending on the tool you use to cut the circular section from the non-electrode half of the clippable earbuds, you may be left with a slightly jagged plastic edge.
This is where the sandpaper sheets come in handy. You can don your safety gloves and manually sand the edge, or you can use a machine to help you get the job done more quickly. Either way, it’s imperative to start with rougher, larger-grit paper and transition to smoother, smaller-grit varieties to finish.
- Repeat the process. Repeat the above steps with one more earbud electrode. With the remaining two earbuds, only repeat step one. This should leave you with eight total halves:
- four with electrode buds
- two that have been sawed
- two that have remained virtually untouched
- Clean the area and prepare earbuds. Remove dust, debris, or trash from your work area. Using a soft, dry cloth, remove any oil or dust from the earbud halves. Doing so will help your adhesive work better, ensuring a long-lasting bond that won’t decay over time. Once you’ve cleaned your area and materials, it’s time to carefully open or prepare your adhesive and get ready to join your pieces together.
- Reassemble and join together. Take two of your electrode halves and join them with two of your sawed halves. You should use the metal components to help them snap together. You should now have two partially-complete earbud adapters.
Now, take a free electrode half (you should have two left), and apply a small amount of strong adhesive to the inside portion, taking care not to touch the rubber or silicon bud. Then, quickly but steadily press the adhesive-covered earbud half to the outside of the sawed half of one of your put-together earbuds.
- Let it dry. After making sure that the buds align, apply pressure to both sides of your new, clippable earbud electrode. Then, let it rest for at least 24 hours before using it. Be sure to repeat the previous step once so that you end up with a pair of earbuds, each of which has two budded electrodes and one sawed half.
As soon as the adhesive is completely dry and the unit is perfectly functional, you can begin to connect the channel wires to the earbuds.
- Identify the channels. Connect one red and one black wire into each pair of connector ports. These wires should connect at the bottom and form a pluggable channel adapter. Each ear will have its own channel.
- Enjoy. Place the earbuds on your tragus, the fleshy portion of the ear closest to the center of the face, and turn on your TENS unit, and enjoy your new vagus nerve stimulation device.
Stripping Pads
If all of the above steps seem like too much work or too much expenditure, you could also choose to adapt the electrode pads that come with most TENS units to work with plastic earbud electrodes. This method requires far fewer tools, and far more affordable supplies.
In any case, if you’d like to pursue this type of adaptation, you’ll need to gather:
- Two pairs (4 total) plastic earbud electrodes
- Two medium or small fabric and adhesive electrode pads
- One roll of masking tape
- One pair of scissors that are sharp enough to cut through stretchy fabric, thin plastic, and adhesive
- A TENS unit that has two channels or outputs and features adjustable pulse width, frequency, and time
And as soon as you have all of your necessary supplies together in one clean, clutter-free workspace, you can go ahead and:
- Cut the pads. Take your scissors and cut the edges off the electrode pads, being sure not to cut too close to the center, where the fibers are located.
- Remove the fabric. You should now be able to separate the different layers of fabric and adhesive to reveal a small fan of black fibers. Discard the various fabric layers, as you won’t need them from this point forward.
- Attach the fibers. Tear a small portion of masking tape from the roll. Four inches should be enough. Then, hold the exposed fibers and cable to the outside edge of the rounded, connection-free half of one of your earbud electrodes. Ensure that the cable aligns with the long plastic arm, and secure with the portion of masking tape.
- Secure the fibers. You can either use your scissors or your finger to tear a skinny portion of masking tape from the roll. This piece will overlap the fan-like fibers, securing them to the opposite side of the circular piece. There should no longer be any fibers that stick out.
- Connect the charges. The stripped cable should already have a connector portion. Plug your red adapter into this side. Plug the black adapter into the built-in earbud connector. These two adapters should connect into a single cable that forms its own adapter, allowing you to connect two finished earbuds to a dual output device.
- Enjoy. Connect the earbud electrodes to your ear’s tragus, and turn your TENS unit on. Set the unit to appropriate settings and enjoy it. Be sure to always follow safety directions and advice before operating.
Health and Safety
As always, women who are pregnant, individuals with pacemakers, and those with electronic ear implants should never attempt tVNS. In addition, it may be wise to use the standard TENS settings when attempting at-home therapy. The recommended settings are:
- Frequency: 25Hz
- Pulse Width: 200–300 μs
- Time: 15 to 20 minutes per session
Do not use a TENS unit on your head, neck, or eyes. It is also unsafe to use standard fabric electrode pads on your ears. Always use caution when operating a TENS unit near sensitive areas, including the ears. Never insert the earbud electrodes into the ear canal.
And of course, you should always consult with your physician before pursuing any new type of self-medication or home treatment.
Conclusion
Until such time that tVNS devices become common, effective, and ultra-comfortable, you can easily modify existing hardware to create your own therapeutic tVNS machine. The best units to use as tVNS machines are ones that have an adjustable frequency, pulse width, and time limit. Dual channels are also a must.
Buyers looking for an upgraded unit can always invest in the iStim EV-804, which could quickly garner some attention with its protective flip-top cover, simple-yet-rugged design, and attractive accessories. Still, the best TENS unit for vagus nerve stimulation is the one that meets your budget, preferences, and needs.
Sources
- Amazon: AUVON EasyStim TENS Unit
- Amazon: Ear Clips
- Amazon: Dremel 3000-2 Rotary Tool Kit
- Amazon: iStim EV-804 TENS Unit
- Amazon: TENS 7000 2nd Edition TENS Unit
- Healthline: Vagus Nerve Overview
- HealthRising: Preparing TENS Leads to Use in Vagus Nerve Stimulation of Ear
- Instructables: DIY Transcutaneous Vagus Nerve Stimulator
- National Center for Biotechnology Information: Transcutaneous Vagus Nerve Stimulation (tVNS) Enhances Response Selection During Sequential Action
- Psychology Today: Vagus Nerve Stimulation via the Outer Ear Takes Center Stage
- ScienceDirect: Lessons learned from transcutaneous vagus nerve stimulation (tVNS)
- The University of Iowa:Transcutaneous electrical nerve stimulator (TENS)
- UCLA Center for East-West Medicine: Introduction to Transcutaneous Electrical Nerve Stimulation (TENS)
- Wikipedia: Vagus Nerve
- Wikipedia: Vagus Nerve Stimulation

4 responses to “Best TENS Unit for Vagus Nerve Stimulation (2023)”
[…] those interested in reaping the physiological benefits of a TENS unit Transcutaneous Vagus Nerve Stimulation seems to have the capacity of treating depression. The means of action result from the direct […]
[…] electrical nerve stimulation (TENS) is an alternative treatment for pain that can be used on severe, chronic (low back pain) or […]
[…] pain relief seems to vary from person to person. Some people only experience pain relief while the unit is on and actively stimulating the nerves. Other users have reported that pain relief lasted even once the unit was turned […]
[…] electrical nerve stimulation (TENS) is a non-invasive technique that aims to provide pain relief by passing a light electrical […]